 AST195
PROJECT: SOME BASIC OBSERVING EQUIPMENT
AST195
PROJECT: SOME BASIC OBSERVING EQUIPMENT
This
is a very simple, very easy, but very important project for doing night-time
observations.
If
you want to observe anything other than the moon, you need your eyes to become
and stay adapted to the dark. The
human eye adapts to the dark in two ways -- it opens the pupil wider, and it
produces chemicals that enhance light sensitivity. The pupil widens quickly, but the chemicals
take a while (as much as half an hour) to make, and they are destroyed by
light. If you use a flashlight to take
notes or make drawings, you will hurt your dark adaptation every time you turn
the light on, and it will be hard to see much through the telescope.
However,
the dark adaptation of your eye is not destroyed by red light. So, to take notes in the dark without ruining
your vision, you need something to make notes on (a clipboard), and a red
flashlight. All the cool astronomers
have a red flashlight and a clipboard, you know!
So,
your assignment is to get a red light and clipboard, and show them to your
professor (by video, of course) for inspection.
The light must be sturdy -- you don't want the red part falling
off in the dark. A common means of
making a sturdy red flashlight is to take an ordinary flashlight and paint the
lens with red (not pink) nail polish or with a red Sharpie or other permanent
marker. However, there are plenty of
other methods as well. But the light
that comes out of it must be truly red.
You
also need some help in finding things in the dark. So the next thing to do is to get some
equipment for your phone. I recommend downloading a star-finder app for
your phone, such as Google Sky (freely available but perhaps not the best --
the really fancy ones have “augmented reality” in which the app shows the sky
as seen by the camera on your phone, and then adds identifying information to
it). Some are free; those that are not
free are generally inexpensive. Choose
one that works on your phone and your budget.
You can also declare that you are going to be “old school” and just use
the finder charts that I provide. That
is OK, but here is one place where a little tech is a nice thing.
And
one final item regarding observing equipment:
In AST 195 all students have the same telescope, which raises the
possibility of students getting their equipment mixed up with that belonging to
someone else (even on-line students). I
encourage you to label all your
equipment. However, it is a requirement
of this project for you to indelibly label the two largest pieces of equipment -- the telescope tube and the
tripod. For example, use a pointed metal
object to scratch your initials into the tube and into the tripod at the
locations shown in the photos on the next page (I used a paper clip to do this,
see below—it does no harm to the scope).
Thus you also need to mark your tube and tripod, and show this to your
professor via video.
·
The video must start with you facing the camera and saying “This
is Jane/Joe in Astronomy 195 lab, and this is my video for the Basic Observing
Equipment project”.
·
The video must show your red light (turn it on and shine it on a
piece of white paper in a dark-ish room).
·
The video must show your clipboard.
·
The video must show your labelled tube and tripod.
·
And lastly, tell me what star finder app you chose, and what you
think of it. If you are opting for the
“old school” method, just say that.
If
you have all this, and the light is truly RED (not pink, not speckled, not
orange), then you get an easy 100% on this project.


TUBE -- mark
your initials just to the right of the Meade logo, as shown.

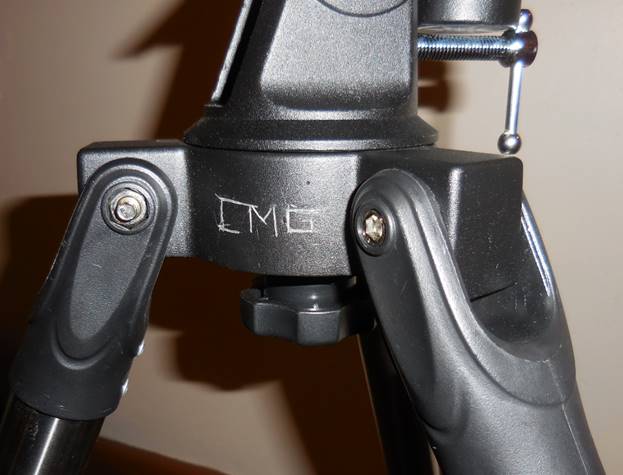
TRIPOD --
mark your initials on the main support, as shown.